Saturday, June 22, 2013

Bubba Goat (reverse ghost course)

We sometimes come up with the most masochistic workouts without thinking too much into the reality of things.  Today, we said "let's do the Bubba Goat in reverse" to give us a different perspective into a course we had done back in January...except today was 40 degrees higher on average!

The first time we did it, it took us 3hrs 30minutes, including a prologue.  We knew our 3 liter Camelbaks wouldn't last that in this heat, but we decided to race whatever length we could manage, with an emphasis on efficiency in route choices.

There would be no controls placed, so how do we do this?  You need the original map and a GPS recorder.  The map contains clues we can use to identify control features, and the GPS route will allow you to review afterwards to see if you really hit the controls.

CP16-14
On our way to CP14, we picked up 16 and 15 with no problem.  At CP14, we hit the first bend in the fence and shot a bearing to the control.
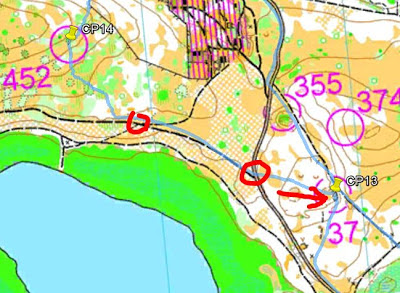

CP13
We trekked diagonally towards the road to cut down distance as we headed to 13.  On the road, we ran into two junctions before shooting a direct bearing to a highly visible embankment that housed 13.


CP12
Again, we cut distance down by heading to the main road at a diagonal.  CP12 was a matter of running a little bit past the trail intersection (A) and locating a marsh.  The control was at the "northern edge of the marsh."
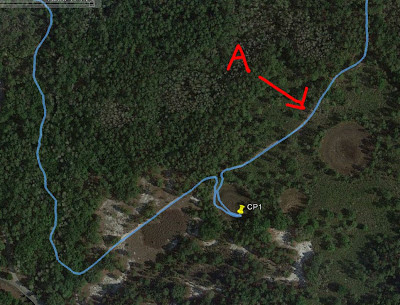

CP11
We took what we thought would be the shortest trail to CP11.  At the intersection (A), we shot the bearing straight south and tagged whatever distinct trees we saw between the trails around us (in red).


CP10
At the intersection near CP10, we saw a line of palmettos (illustrated on map in green) that led to a mapped dry ditch.  We assumed the northwest end of that dry ditch contained the punch.


CP9
We took some diagonal lines to cut down distance to CP9.  At the trail opening (A), we shot a direct bearing identify the forest that contained CP9.  The forest had an opening with one row of orange trees that we followed to the end to hit the punch.


CP8
We followed a line of trees to exit, and then a ditch line that led to a small lake.  From there, we rounded the lake, followed a road mindlessly, only to realize we needed to shoot another bearing to CP8.  Going down to it, we checked off a 'ditch lake' to our left.  After punching, we diagonally exited to ensure cutting down on the distance, and therefore emphasizing efficiency.
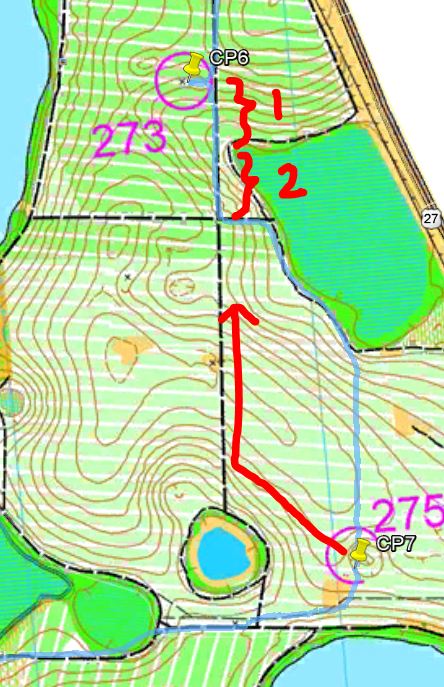

CP7
It was a long jog to CP7, but the conversations we had took our mind off the grueling task.  To hit 7, we first identified the opening in the woods (A), and then shot a bearing to an easily identifiable, large depression.


CP6
Our rule of thumb for determining whether or not to jog the further trail or bushwhack the shorter distance is "3 to 1".  If the faster, smooth-running trail is less than 3 times the distance of the bushwhack, then we'll choose to jog it.  We broke that rule exiting CP7 just to see what the area here was like.  It was slow going alright.

CP6 took some precise measuring and awareness of land features.  As we headed up from the 4-way intersection, the CP was twice the distance of when the vegetation border ended to the right.  The topographic lines also indicated we would be going uphill, and not yet hitting the peak of elevation before cutting into the woods to find this man-made object (a water pump).  After cutting in about 25m, it was easily visible from the distance.


CP5
We followed the fence on the right side, hopped the fence after the trail ended, and poked back in after the lake ended.  As we headed alongside the lake, we looked far into the distance and identified the cluster of trees and clearing at the northern border of the lake (CP5).


CP4
Look how straight our bearing was from CP5 to CP4.  The terrain was very slow going and the heat was killing us here.  I was really wanting to sharpshoot directly to the intersection near CP4 (A), and we were super close--only 35m away on a 1100m whack through that dense shrubbery.  As to the decision of whacking vs running the longer route....the whack didn't fulfill our requirements of 3 times the distance.  The whack was 1100m, the run was 2000m (B).  If we were fresh and the weather was much cooler, the run definitely would have been the better choice, as Quickroute reported our average jog at 3 times the speed of our whack along that line.


CP3
At CP4, we tagged an extra tree for good measures, but the 2nd tree threw us off course towards CP3.  It didn't matter, since we corrected at the trail, locating the highest point (A) and shooting another bearing for better accuracy.  The trees changed our route some, but we found the opening which housed it.


We were only 15m away from CP3, as measured in Google Earth, which in real life, we would have easily seen and punched it.  This area was pretty ambiguous when it came to "open clearings".


CP2
Easy.


CP1
The map showed no clearly visible attack points, so I determined a 165m pace count from the trail bend (A) before poking into the marsh.  It was successful.


As we finished CP1, we both ran out of water and had to cut off the Bubba Goat's prologue (which would have taken 30-40min).  In our overheated state, we wisely cut that portion off and chose the absolute shortest route back (there were many trail choices).  While jogging/trekking back, we identified 3 out of 7 CPs from the prologue for good measures and finished in 3hrs 15min, a distance of 18.56km.


Here is our GPS route:

Sunday, June 16, 2013

Pangea - Scar AR, Elite 6hr


I remembered last year's Scar AR was a race we ran in the most heated conditions among environments that looked the same wherever you went--fields of palmettos and sugar sand.  Although there were some cloud coverage this year, the heat would later play a role in the fate of our race.

Stuart ran alongside me at his second event.  We scored a 3rd place during his first event.  He's a great racer to have, someone with an above average memory and who constantly engages with navigational talk during the race.

race map and instructions 

Prologue

The race started with a quick 5 minute prologue of scrambling around the parking lot area to grab five control points (CPs).  I believe this was designed to prevent a clog up of boat launches that came next.  We originally thought the punches would have a corresponding letter to them and purposely skipped a couple that we found correctly.  No worries since they were all within close proximity to each other.


Canoe

We decided to skip CP8 from the start, remembering how overgrown it was last year.  And how we conveniently carved the vegetation out to form a clear path for racers who came back to it in the end.


CP7 appeared easy to grab from the looks of the map, but we missed it on our way up the river.  In fact, in real life, it looked nothing like it was drawn on map.  There was no body of water north of it or an obvious island below it.  I still struggle with these topo maps on water sometimes.


CP6, 5, 4, and 3 had the benefit of other racers punching them ahead of us.  I still kept track of my position on my own map, however, just in case.  I use a little pinch of sticky tack as my map marker and keep track of every turn.  It works great for me.


Sticky tack paid off at CP1, where we accidentally followed a few solid teams but they overshot the channel leading down into CP1.  As they headed further north, I had a hunch we overshot too, which we did.  Stuart and I had been identifying some small channels to our left in anticipation for CP1.  We turned around into one of them and immediately found it.  It eluded every team ahead of us and upon talking to them after the event, they thought they were going towards CP2 at that point.


Once we identified the river split, CP2 was just a matter of paddling our way up on the adjacent river til we found it along the channel.  As we headed back, we traded places with Ron Eaglin's team a couple times.  We enjoyed our assumed first position, but knew it wouldn't last long :)  Apparently they had skipped CP7 on the way out too, and as I attacked in at an incorrect nearby opening, they found it on first try and just pulled away.


We picked up CP8 in the end and immediately transitioned out to the foot section with no stopping.

Run 1

CP10 has got to be the gnarliest bushwhack I have experienced to date.  I had determined the first trail bend as an attack point, but upon getting there, it was a thick wall of trees, palmettos, brush and stiff criss-crossing brambles.  So we went further to see if the next trail bend would provide a better opening.  It did not.  I told Stuart, "either we go in here or back there."  He had a look of "wtf??" but complied :)  The wall of vegetation looked like this:


Usually we just bust out our machetes and slash away at a bushwhack, but this entangled mess had our feet and arms roped up at times.  A little further in and we ran into some eye poking brush.  It was even denser!


We eventually ran into vegetation that had less density at the lower foot or two.  Stuart took initiative, crawled on hands and knees, and slithered belly down for about half a football field.  Here is some incredible footage:


CP12 was next.  The quicker way was to bomb down from the trail north of it (route A).  We stayed safe by going the long route (route B).


CP14, 13, 11, and 9, completed the counter-clockwise loop, and were relatively easy with our skills.

Bike 1/Run 2

Our morning strategy had us picking up 21, 20, and 17, on the western ends, and then heading up to gather the northern controls, before going back down to 18 and 19 on the return route.

On our way to 21, I became pretty concerned with Stuart.  We had been biking extraordinarily slow, almost the speed of jogging, but he struggled to keep up on the sugar sand.  His breathing resembled what I would be like when doing rocky sprints on a treadmill.  I could only imagine what his heart rate was like.  I took off to grab CP21 when we were near, while he walked the bike behind me to save whatever energy he could.  Then I strapped his bike to the tow rope for a few minutes, but it was futile.  We were just beginning the biking portion, in which trails would get worse and worse up north.  I had seen and heard these symptoms before with my other race buddy, Nate, during another scorching hot race, in which he thick-headedly endured about 4hrs of heat exhaustion.  It is an experience I would never wish upon another man.


Pride can only take you so far, but for Stuart, I strongly suggested to him that he ended the race early.  There was no good to be had for "toughing it out".  I know it took a lot for him to swallow, and it was a race he had been training hard and truly looking forward to, but it was the right choice.  He insisted I continue forward and that he would walk back.  I acknowledged the DQ and plowed ahead.  It also solved the issue of him forgetting his helmet on this bike portion :)

CP20 and 17 flew by en-route to CP16.  At CP16, I bushwhacked through some dense razor sharp palmettos taller than my head.

some environments on the north side

red swamp

there's a path underneath somewhere

At CP15, I debated changing my morning strategy of attacking these CPs clockwise.  But I stuck to the plan, ditched the bike here and ran to grab 22 and diagonally bushwhacked to 23 since all was slow-going up there.

My plan for getting 24 was something like this:


In actually, the plan executed like this (below), lol.  I was mentally fatigued at this point.  After missing 24, I took a safety bearing of West to get out, only to hit the canal and follow it down.  I gave it a couple minutes to find WP2, but with time I had allocated for getting back to my bike to finish the race, I took another abort bearing back out to the trail I came from.


As I biked back down the trails, I took the route that would allow me to touch CP18 and 19.  18 was easy to find.  At 19, I knew with a clue of "small pine between marshes", it would be difficult to find with how vague marshes are illustrated on this map.  However, I did see a marsh from the trail, so I gave it an attempt.  The first marsh was a large circle of overgrown yellow grass-like plants.  I followed the southern perimeter and ran up to the west side of it, but there, the brushes were too dense I that I could hardly see 5ft in front of me.  There were plenty of small pine trees out there!  I went and tagged about a dozen of them but failed to see any controls.  Upon GPS review, I was literally on top of it!


That last attempt at CP19 forced me 4 minutes into overtime.  Oh well, I was already DQ'd.  As I booked it back to the Main TA, it drizzled, rained, and then poured.  Without the DQ, Canyoneros were 4th!  At the Main TA, it was cool to see plenty of father/son/daughter teams.

Saturday, June 8, 2013

FLO - Little Big Econ

This place is pretty tricky when it comes to orienteering.  I've been stumped here before, and I was stumped here again, today.  I like to use the Florida Orienteering events to try new things, learn through repetition, and get a good workout.  Here's the breakdown:

CP1
The first CP always calibrates my head with map scale, time and distance.  I overran CP1 and had to backtrack in a loop to luckily find it.


CP2
I slightly overran CP2, found the trail by the river, but not the mapped marsh.  So I had to pop back out on the trail and attack it again.  Found it quickly on second try (pic above).

CP3
I took the smaller trail going towards this control and as I saw the river to my right, I poked out and saw the CP a mere 40m across it.  Do I get dirty and plunge into the river?  Not this soon.  I went back and around the channel.


CP4
This one was easy to find, as I've been to this location before during another FLO event.

CP5
On way out, I debated bushwhacking a straight line towards CP5.  Upon heading south out of CP4 and observing the vegetation en-route to the next control, I deemed it way too thick and entangled with vines to consider.  So I ran the long route.  I wasn't thinking as I headed on the south trail near the river and overshot the first trail to the control.  No worries, I took the 2nd one and headed up to CP5 by following the creek.

CP6
Upon GPS replay, it appears I spent 35min trying to find this one from the moment I attacked from the main trail to the moment I returned to the main trail--ouch!


The attack point I wanted to use was where the two trails were at its closest (marked blue above) and shoot a bearing straight down.  Usually I can rely on my sharpshooting skills to hit a target.  However, I didn't find out I had the wrong attack point until I got home, but I can understand why I spent so much time running around in the forest once I counted paces to the proper distance.

My saving grace was that I found a creek to the west, which was mapped to branch out to the east.  I used that intersection, followed the creek and walked right up to CP6.

CP7
This was another tricky one.  The mapped trail going north was completely overgrown, with just a barely discernible creek that revealed it.  I overshot it the first time, realizing it after seeing my compass turn south, but then found the trail with the clue of a puddle of water on the trail at point A.  On the map, there was a small marsh that leaked onto the road there that I used to follow.


Once I got on the trail that was completely overtaken by weeds, some as tall as me, I headed north, trying to find point B so I could use point C as an attack point.  I never saw it, which led me further north.  After getting a feeling that I was running too far, I dashed into the woods to see if luck would find it.  Hehe...luck works sometimes, but it's best try to develop skills to avoid using it :)  I didn't find it.

So I ran back south to see if I just didn't see the trail at point B.  I used the tall trees (colored green on the map) to sense I was getting nearby.  Sure enough, it was a trail completely overgrown as well, but not as bad as the one prior.  Once I found the trail, it was a homerun to CP7.

CP8
My rule of thumb for bushwhacking is "3 to 1".  If the running trail is more than 3 times the distance of the bushwhack, choose the bushwhack.  Why?  It conserves energy.  I also assume that a good running pace is 6mph, and a bushwhack is 1/3 of that at 2mph.

My goal was to hit point A, so that all I had to do once I found the trail was go north.  The direct approach is to hit point B exactly, but if you do that, sometimes you have to guess if you accidently overshot it too far north or south, causing you to confirm by running both north and back south, sometimes.  If you deliberately miss it in one direction, you have better chances of knowing you just have to scout the other direction.

Come to find out, my bearing was as sharp as a sushi knife, as I hit point A with some crazy accuracy across almost a kilometer of distance.  Find CP8 was a matter of locating the trail intersection (point B) and following the creek til you found the control, which wasn't far from it at all.

CP9
I wasn't thinking here since I originally planned on using point A to attack straight down to CP9.  For some reason, I ran to point B, but used the same bearing I had in mind for point A.


This mistake forced me to scramble in the area before running back out to the trail to attack it with the correct bearing.

CP10
I had to squint hard to see the trail crossing over into CP10.  Seems like I took the most direct approach.

All in all, this event has reinforces the fundamental ideas of orienteering to me.  Focus at all times and read everything on the map to confirm position.

here's my GPS route: